Dragon Soul Main Page
![]()
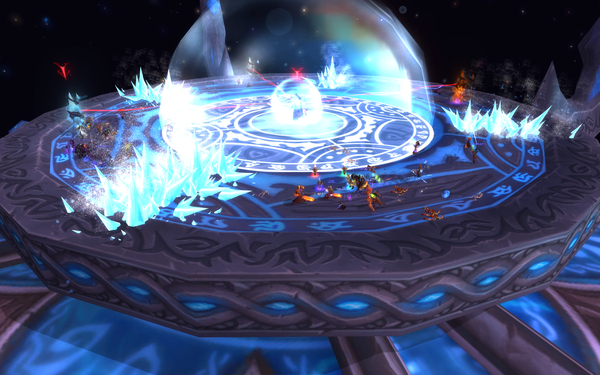
Overview of the Fight
The fight against Hagara is made up of 3 phases: Main Phase, Ice Phase, Lightning Phase. The Main Phase lasts 50 seconds and is followed by either the Ice Phase or the Lightning Phase. The fight goes back to the Main Phase as soon as your raid has finished dealing with the Ice Phase or the Lightning Phase. The Ice Phase and the Lightning Phase alternate in such a way that a fight will usually look like this:
- Main Phase with a shortened duration of approximately 30 seconds;
- Ice Phase or Lightning Phase (depending on the visual effect on Hagara's weapon before the pull);
- Main Phase;
- Lightning Phase or Ice Phase;
- Main Phase
- Ice Phase or Lightning Phase;
- Main Phase;
- Lightning Phase or Ice Phase;
- ...
To determine whether you will get an Ice Phase or a Lightning Phase first, simply look at the visual effect on Hagara's weapon before the pull (it will either be a frost effect or a lightning effect).
Each phase will require your raid to properly deal with positioning constraints or to move in a synchronised fashion:
- The Main Phase will require members of your ranged group to position themselves in such a way that they prevent missiles from reaching the melee group, all the while freeing players who get encased in Ice Tombs.
- The Ice Phase will require your raid to run in a clockwise fashion on the edge of the platform to keep damaging Ice Waves at a safe distance. Icicles falling on the platform also need to be avoided. At the same time, DPS players will need to destroy the crystals that protect the boss.
- The Lighting Phase will require your raid to create a chain of players to propagate lightning in order to disable several objects that protect the boss.
| Main Phase | Ice Phase | Lightning Phase |
|---|---|---|
 |
 |
 |
Main Phase
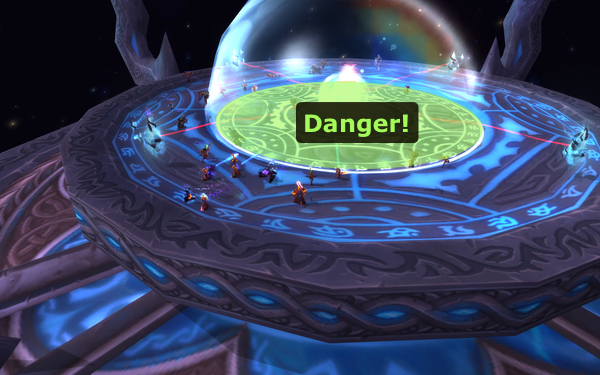
The Main Phase is a tank and spank phase. The boss should be kept in the middle of the room and be damaged as much as possible. The ranged group must also deal with a few abilities that mostly require proper positioning and good reaction time.
After 50 seconds, the Main Phase ends and an Ice Phase or a Lightning Phase starts.
Abilities
During this phase, Hagara will use the following abilities.
- She has a melee attack that she uses every 2 seconds. Because she also spends a lot of time casting her various abilities, she ends up using her melee attack every 5-6 seconds in average. It deals moderate damage to the tank and should not pose any problem.
-

-
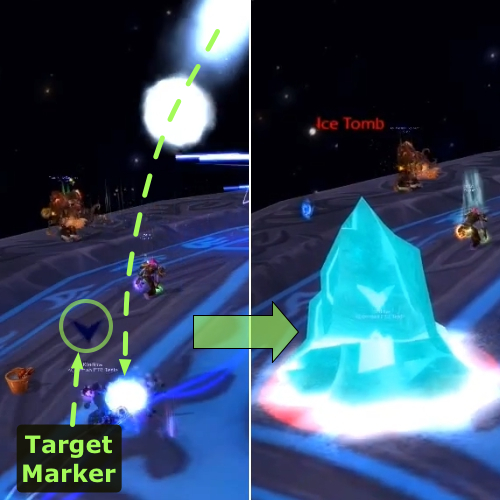
 Ice Tomb is cast once per Main Phase (usually 10 seconds into the phase). This ability, which is absent in LFR difficulty, encases 2 random players (but never the tank) in 10-man difficulty and 5 in 25-man difficulty in Ice Tombs. These tombs need to be destroyed before the encased players can regain control of their characters. As soon as the ability is cast, targeted players are marked with a blue arrow on top of their head and 7 seconds later, they are frozen. Ice Tomb deals approximately 7,000 damage damage per second to encased players. The ability does not chain to nearby players.
  Focused Assault is the same in all difficulties and is cast every 15 seconds. This ability is channeled for 5 seconds and causes Hagara to attack in front of her for 50% of her normal melee damage every 0.5 second. While she does this, Hagara remains stationary so the tank can easily move away from her.
 Shattered Ice is always cast either right before or right after Focused Assault. This ability, which targets one random player, slows down movement for 4 seconds and deals 78,000 Frost damage in 10-man difficulty, 100,000 in 25-man difficulty, and 65,000 in LFR difficulty.
-
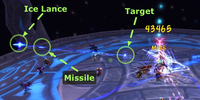
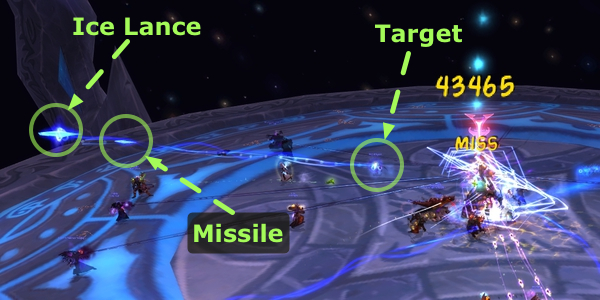
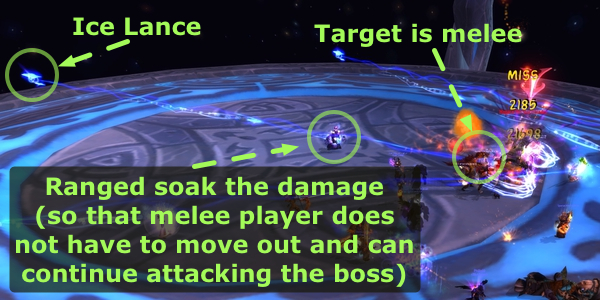
 Ice Lance is cast twice per Main Phase. Every time, it summons 3 crystals. Each of these crystals fixates on a random player and for 15 seconds send one missile per second towards this player (so 15 missiles in total). When a missile reaches its target or another player on the path to its target, it explodes and inflicts Frost damage to every player in a 3 yard radius (15,000 in 10-man difficulty, 20,000 in 25-man difficulty, and 13,000 in LFR). In 10-man and 25-man difficulty, it also reduces the attack speed (but not the casting speed) of whoever gets damaged by 25%.
Strategy
Once you understand precisely what the abilities do, the strategy is simple and can be summed up in the four following points:
- When Hagara is using Focused Assault, the tank should back away from her (either by walking back, or strafing backwards). This will minimise the damage that the tank takes, as the boss is slow to catch up and must break her channel to do so. Make sure that the tank does not turn their back to Hagara, however.
- Healers should be especially wary of the damage done by Shattered Ice as it can easily one-shot someone who has previously been damaged by Ice Lance.
- Shattered Ice can be warded with
 Dark Simulacrum, which gives the Death Knight who casts it a nice amount of extra damage.
 - DPS need to free players trapped by Ice Tomb. Note that this does not apply to LFR difficulty, as Ice Tomb is absent from this level of difficulty.
-
 When a melee player is targeted by Ice Lance, a ranged DPS or a healer needs to step in the path of the missiles so that they do not reach the targeted player. The reason for doing this is two-fold. First, as the missiles deal proximity damage (3 yard) upon reaching their target, letting them reach a melee player will deal damage to the entire melee group. Second, in 10-man and 25-man difficulties, if melee players are hit by the missiles, their DPS will suffer from the attack speed reduction that they will receive. A targeted melee player could move out of the melee group but they would be unable to continue attacking the boss whereas the ranged player who soaks can continue performing their duties.
Ice Phase
50 seconds into a Main Phase (if this Main Phase was preceded by a Lightning Phase), Hagara will enter an Ice Phase. Hagara casts ![]() Water Shield on herself, which causes her to remain stationary and immune to all damage until the raid has successfully completed the phase.
Water Shield on herself, which causes her to remain stationary and immune to all damage until the raid has successfully completed the phase.
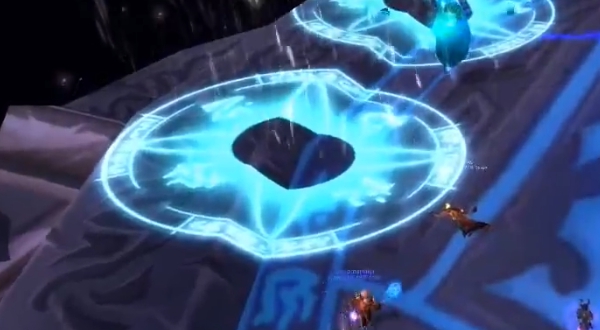
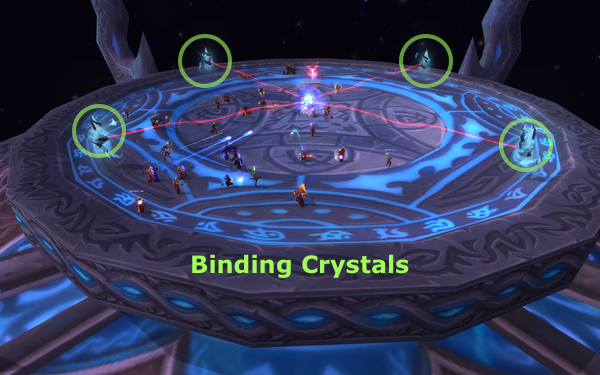 During the Ice Phase, the raid will be chased around the platform by very deadly Ice Waves. While running to avoid the waves and the Icicles that fall from the sky, the raid will need to destroy 4 Frozen Binding Crystals by attacking them whenever possible.
When all 4 crystals are destroyed, the Water Shield protecting Hagara is removed and she is debuffed with ![]() Feedback, which, for 15 seconds, causes her to be stunned and take 100% increased damage. The Main Phase restarts when the debuff drops off Hagara.
Feedback, which, for 15 seconds, causes her to be stunned and take 100% increased damage. The Main Phase restarts when the debuff drops off Hagara.
Abilities
During the Ice Phase, your raid will be faced with the following abilities:
-
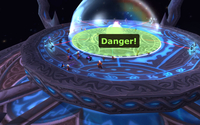
 Watery Entrenchment prevents players from entering the center of the platform as doing so is very deadly (15% health lost every second and movement speed reduced by 50%). This Watery Entrenchment is created a few seconds into the Ice Phase, giving players time to move to the edge of the platform.
 -
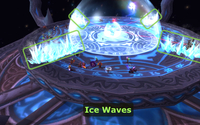 Ice Wave summons 4 Ice Waves a few seconds after the entrenchment is created. Each of these waves extends from the boss to the edge of the platform and move in a clockwise manner around the platform at a speed slightly slower than a player's base running speed. Being hit by a wave is extremely deadly as it causes 200,000 Frost damage in both 10-man and 25-man difficulties and 130,000 Frost damage in LFR difficulty, in addition to increasing Frost damage taken by 50% for 2.5 seconds.
 -

 Icicle causes Icicles to regularly fall from the sky onto the outer part of the platform. Icicles come by waves, each wave consisting of about 10 Icicles and coming 15-20 seconds after the previous wave. A visual effect marks the location where an Icicle is going to fall. After 4 seconds, the visual effect disappears and 1 second later, the Icicle hits the ground, damaging everyone within a 7-yard radius (the area previously marked with the visual effect) for 100,000 damage in both 10-man and 25-man difficulty. In LFR difficulty, this ability is absent.

Strategy
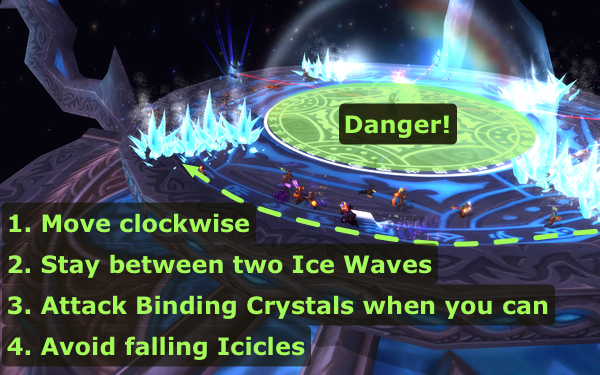 Just like with the Main Phase, the strategy for the Ice Phase is simple, once the abilities are properly understood. The simple tasks that raid members will need to perform during this phase are the following (see the image on the right for a visual overview):
- Move clockwise so that you stay between two Ice Waves. Getting hit by them is very deadly, so make sure to remain at a safe distance. The visual effect for the Ice Waves can be misleading, as you can be hit even if the visual effect does not reach you, so be careful.
- Whenever you can, attack the Frozen Binding Crystals. Always keep an eye on the Ice Wave chasing you when you attack a crystal, as it is easy to get carried away and lose track of their exact position.
- In 10-man and 25-man difficulties, you also need to keep an eye on the falling Icicles and move out of the areas where they are going to hit the ground.
To give you an idea, it should take no more than 2 turns around the platform to destroy all 4 Frozen Binding Crystals.
During this phase, healers should have only heal the occasional damage from falling Icicles. Should a player manage to survive being hit by an Ice Wave, they should be healed quickly before they take damage again.
Lightning Phase
50 seconds into a Main Phase (if this Main Phase was preceded by an Ice Phase), Hagara will enter a Lightning Phase. When this happens, Hagara casts ![]() Water Shield on herself, which causes her to remain stationary and immune to all damage until the raid has successfully completed the phase.
Water Shield on herself, which causes her to remain stationary and immune to all damage until the raid has successfully completed the phase.
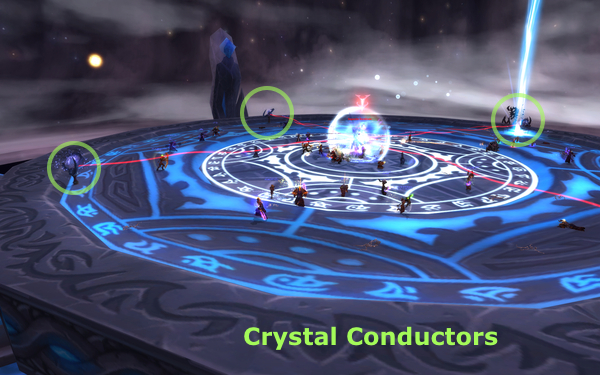 During the Lightning Phase, the raid will have to overload the 4 Crystal Conductors that protect Hagara. Players need to form chains so that lightning propagates through them, eventually reaching the conductors and overloading them.
When all 4 conductors are overloaded, the Water Shield protecting Hagara is removed and she is debuffed with ![]() Feedback, which, for 15 seconds, causes her to be stunned and take 100% increased damage. The Main Phase restarts when the debuff drops off Hagara.
Feedback, which, for 15 seconds, causes her to be stunned and take 100% increased damage. The Main Phase restarts when the debuff drops off Hagara.
Abilities
 During the Lightning Phase, the raid will be faced with a Bound Lightning Elemental, whose death causes the overload of a nearby conductor, which the raid then uses as a source for propagating lightning to the other conductors. There are three things to note about this Elemental:
- it always spawns at the same place, near the entrance portal;
- it should be picked by the tank;
- it performs a weak melee on its current target every 2 seconds.
Also, the raid will take constant damage from ![]() Lightning Storm. Every 2-3 seconds, this ability hits 3/4 random players in 10-man difficulty and 7/8 players in 25-man and LFR difficulties. Each player takes 15,000 Nature damage in 10-man difficulty, 17,500 in 25-man difficulty, and about 10,000 in LFR difficulty. Every time a player is hit by Lightning Storm, they receive a stack of a debuff that increases Nature damage taken by 5% per stack.
Lightning Storm. Every 2-3 seconds, this ability hits 3/4 random players in 10-man difficulty and 7/8 players in 25-man and LFR difficulties. Each player takes 15,000 Nature damage in 10-man difficulty, 17,500 in 25-man difficulty, and about 10,000 in LFR difficulty. Every time a player is hit by Lightning Storm, they receive a stack of a debuff that increases Nature damage taken by 5% per stack.
Strategy
Just as with the other two phases, the main difficulty of this phase resides in understanding what the abilities do. Then, the strategy is simple.
As the phase begins, a Bound Lightning Elemental spawns and needs to be picked up by the tank. This add must then be brought next to 1 of the 4 Crystal Conductors and killed. This will cause the chosen Crystal Conductor to become overloaded.
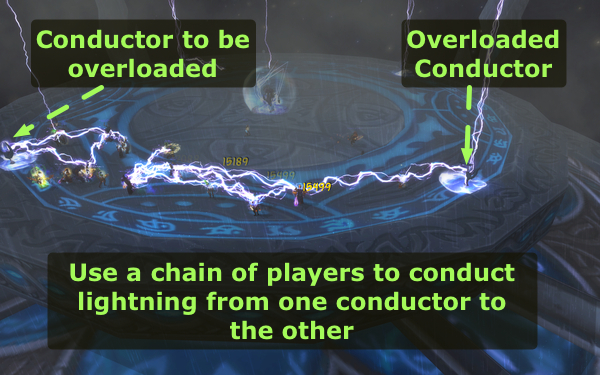 From this point on, your raid will propagate the lightning emitted by the overloaded Crystal Conductor to another Crystal Conductor. This will cause the other Crystal Conductor to also become overloaded. To do so, the players from the raid need to create a chain to propagate lightning from the overloaded Crystal Conductor to the other Crystal Conductor. Once this is done, the newly overloaded Crystal Conductor can be used as the source of a new chain that will overload one the remaining, non-overloaded Crystal Conductors.
As you can see from the screenshots, the chain does not need to be perfect. The maximal range for lightning propagation seems to be around 10 yards. If, somewhere in the chain, the distance between two consecutive players go over the maximal range, a few seconds will elapse before the end of the chain loses the lightning, giving enough time for overloading the targeted Crystal Conductor before the lightning runs out.
Tips
Because ![]() Lightning Storm cause players to take increased Nature damage in this phase, healers will have to face increasingly heavy damage. To alleviate this, the raid should switch to Nature resistance during this phase by using either of
Lightning Storm cause players to take increased Nature damage in this phase, healers will have to face increasingly heavy damage. To alleviate this, the raid should switch to Nature resistance during this phase by using either of ![]() Aspect of the Wild from a Hunter and
Aspect of the Wild from a Hunter and ![]() Elemental Resistance Totem or
Elemental Resistance Totem or ![]() Healing Stream Totem (improved with Glyph of Healing Stream Totem) from a Shaman.
Healing Stream Totem (improved with Glyph of Healing Stream Totem) from a Shaman.
Mages (![]() Ice Block), Paladins (
Ice Block), Paladins (![]() Divine Shield) and Rogues (
Divine Shield) and Rogues (![]() Cloak of Shadows) can and should remove their stacks of
Cloak of Shadows) can and should remove their stacks of ![]() Lightning Storm when they start taking too much damage.
Lightning Storm when they start taking too much damage.
With a bit of practice, you can divide your raid in 2 groups that will go overload the crystals around the platform in opposite directions. This allows the raid to spend less time in the Lightning Phase (and therefore take less damage from Lightning Storm).
When to Use Bloodlust, Heroism, or Time Warp?
![]() Bloodlust,
Bloodlust, ![]() Heroism, or
Heroism, or ![]() Time Warp should be used at the end of an Ice Phase or a Lightning Phase, so as to benefit from the 100% increased damage that the boss takes for 15 seconds.
Time Warp should be used at the end of an Ice Phase or a Lightning Phase, so as to benefit from the 100% increased damage that the boss takes for 15 seconds.
Learning the Fight
The execution of the fight does not require much practice as the raid is not faced with overly complex tasks. The only part that may pose problems is the overloading of the 4 Crystal Conductors in the Lightning Phase.
Regarding these Crystal Conductors, it is important to note that ![]() Water Shield has a duration of 300 seconds, which probably means that the raid has 300 seconds to complete the Lightning Phase. So there is ample time to practice overloading the Crystal Conductors, as long as the raid can survive the increasing damage from
Water Shield has a duration of 300 seconds, which probably means that the raid has 300 seconds to complete the Lightning Phase. So there is ample time to practice overloading the Crystal Conductors, as long as the raid can survive the increasing damage from ![]() Lightning Storm.
Lightning Storm.