Bosses and encounters
- The Lower Spire
 Lord Marrowgar
 Lady Deathwhisper
 Gunship Battle
 Deathbringer Saurfang, described as "the Lich King's most powerful death knight"
- The Plagueworks
- The Crimson Hall
- Blood Prince Council
- Prince Valanar
- Prince Keleseth
- Prince Taldaram
- Blood-Queen Lana'thel
- Frostwing Halls
 Valithria Dreamwalker
 Sindragosa, former consort of Malygos, raised as the Queen of the Frostbrood.
- The Frozen Throne
![]() The Lich King, master of the Scourge, is the final boss of Icecrown Citadel.
The Lich King, master of the Scourge, is the final boss of Icecrown Citadel.
coming soon
coming soon
- Gunship Cannon
 Cannon Blast 150 yd range—Launches a cannonball at the target. Inflicts 1000 Siege damage and generates 6 to 10 Heat. Instant
 Incinerating Blast 150 yd range—Consumes all of the cannon's Heat to launch a massive ball of fire at the target. Inflicts 1000 Siege damage plus additional damage per point of Heat. Instant
- Muradin Bronzebeard / High Overlord Saurfang
 Battle Fury—Increases all damage done by 5%. Instant. 20 sec duration. +7% in 25-player mode
 Cleave Melee range—Inflicts 120% of normal melee damage to an enemy and its nearest allies, affecting up to 3 targets. Instant (6 sec cooldown)
 Rending Throw 50,000 yd range—Throws your weapon at the enemy causing 3010 to 3990 weapon damage and an additional 2000 Physical damage every 3 sec for 18 sec. Instant
- Skybreaker Sorcerer / Kor'kron Battle-Mage
 Below Zero 50,000 yd range—Freezes the target in a block of ice by concentrating and freezing moisture in the air. The caster must channel to maintain the ice block. Instant
- Skybreaker Mortar Soldier / Kor'kron Rocketeer
 Rocket Artillery 50,000 yd range—Launches a rocket that explodes on impact, inflicting Fire damage to nearby enemies and Siege damage to the enemy gunship. 5 sec cast
 Explosion 50,000 yd range—The rocket explodes, inflicting 6300 to 7700 Fire damage to nearby enemies and Siege damage to the enemy gunship. Instant
Boarding party
- Skybreaker Sergeant / Kor'kron Sergeant
 Bladestorm—Instantly Whirlwind up to 4 nearby targets and for the next 6 sec you will perform a whirlwind attack every 1.0 sec. While under the effects of Bladestorm, you can move but cannot perform any other abilities but you do not feel pity or remorse or fear and you cannot be stopped unless killed. Instant (7 sec cooldown)
 Wounding Strike Melee range—Inflicts 200% weapon damage and leaves the target wounded, reducing the effectiveness of any healing by 25% for 10 sec. Instant. -40% healing in 25-player mode.
 Desperate Resolve—Increases armor and attack speed by 60%. Instant. +120% Armor in 25-player mode.
- Skybreaker Marine / Kor'kron Reaver
- Desperate Resolve—Increases armor and attack speed by 60%. Instant. +120% Armor in 25-player mode.
- Skybreaker Rifleman / Kor'kron Axethrower
 Shoot 50,000 yd range—Shoot at the target, inflicting 3800 to 4200 Physical damage. 2 sec cast. 5700-6300 in 25-player mode
 Hurl Axe 50,000 yd range—Hurl an axe at the target, inflicting 3800 to 4200 Physical damage. 2 sec cast. 5700-6300 in 25-player mode
- Shared abilities
 Burning Pitch 50,000 yd range—Throws gob of burning pitch that sets the target area aflame, inflicting 17250 Siege damage and an additional 7500 Fire damage over 3 sec. 2.5 sec cast
All enemy NPCs except the Commanders and the Battle-Mage/Sorceror gain experience the longer they are left alive, starting from Regular and progressing to Experienced, then Veteran, and finally Elite. Depending on rank, damage and attack speed are increased.
Due to this progression it's a good idea to kill enemy NPCs quickly.
Strategy
Both ships deal siege damage to each other. The one going down first loses the battle. Siege damage is dealt to the enemy ship by firing the guns. The enemy gunship deals siege damage to the player's ship by shooting rockets.
Besides this siege battle, the players have to deal with enemy boarding parties and also need to send an offensive boarding party on the enemy ship from time to time. Additionally, the rocket teams and other enemy ranged damage dealers keep strafing all players. The rockets can be avoided by moving away from their target marks (similar to Mimiron's rockets, but less damaging than these), the ranged damage can simply be healed through.
The raid should be split up in a (smaller) offensive team which includes enough damage dealers (melee preferred) to man the guns, one tank and an appropriate number of healers (1 in 10 player, 2-3 in 25 player), and a (larger) defensive team including everyone else.
Only the offensive team needs the jet packs provided by the engineer NPC on the player's ship, but usually the whole raid finds them interesting enough that everybody takes one. They need to be equipped before entering combat, as they are a clothing item (shirt) and cannot be equipped once in combat. The jump pack is used by 'using' it and selecting a destination to jump to (this is usually practiced intensely before the battle starts).
Defense
The defensive team is concerned with keeping the player's gunship free of enemy boarding parties and with killing enemy ranged attackers.
Enemy boarders who don't have players on their aggro list instead attack the player's gunship with burning pitch, which deals very high amounts of siege damage. Therefore, all members of the enemy boarding party must be tanked immediately. Ranged AoE is highly effective. Due to their whirlwind, melee must be careful until all Sergeants are dead.
A few seconds after all members of the previous boarding party are dead, a new boarding party spawns. It may be a good idea to leave the last member of the boarding party alive for some time, so that the ranged damage-dealers can kill the ranged damage dealers on the enemy ship. Another option is to dedicate some ranged damage-dealers full-time to killing the mobs on the enemy ship.
Offense
The offensive team consists of melee attackers, a tank, and dedicated healers for that tank.
The offensive team fires the guns until they're frozen. This freeze occurs every 45 seconds or so. When the guns are frozen, they cannot fire. They're unfrozen by killing the mage on board of the enemy ship. The offensive team leaves the guns and jumps over to the other ship (the healers can actually stay on the edge of their own ship). The tank needs to keep the enemy commander busy. The enemy commander gains a stacking buff while in combat, thus the offensive party must be quick to kill the mage (depending on tank gear 20-30 seconds). After the mage is dead, they jump back and resume firing the guns.
Even if the boarding party is fast, they should not try to kill a few extra mobs on the enemy ship - it is more efficient to quickly man the guns again.
The offensive team must be careful not to leave behind anything which could keep the enemy commander in combat (totems, pets or the like). Back on the player's ship, the offensive team should move away from the enemy ship to make sure the Commander gets out of combat.
The ship's guns have two different attacks: a normal shot bound to "1" which deals 1000 siege damage. Firing a normal shot also generates between 6 to 10 heat, which fills up the heat gauge on the gun (begins at 0, maximum 100, losing 1-2 heat per second while not firing). The second shot is bound to "2". It's a heated shot which immediately expels all the accumulated heat on the gun and deals 1000 siege damage plus extra damage for each unit of heat, up to just under 10000 with a nearly filled bar. If the heat meter reaches or exceeds 100, the gun overheats and both shots are locked for five seconds until all heat has been drained.
Both types of shot not only deal siege damage but also damage enemy mobs, thus shots should be angled at the rocketeers/ranged NPCs.
The siege damage to the player's ship is mainly dealt by the rocketeers. So disrupting them and not allowing them to gain high levels of experience significantly reduces the damage done to the player's ship. This is most effectively done by the gunners shooting at the rocketeers.
Alternate
Keep everything this same, except for the Offensive squad. If the tank and his/her healer can hold the boarding party long enough, all of the DPS can jump to the far boat to down the enemy mage faster, resulting in a faster battle and more time to DPS the enemy boat down. Make sure the tank and healer can handle the mobs long enough for your raid to get over there and back without dying. Try kiting them over to the leader to have him assist if needed.
Heroic Mode
- Rockets have a 7 Yard knockback
- Mage has more HP
- Enemy Gunship has more HP
coming soon
coming soon
Abilities
 Ooze Flood-Inflicts 5,363 to 5,637 damage every second and reduces move speed by 25% for 5 seconds.
 Slime Spray-Raining Green Ooze. Deals 5,363 to 5,637 Nature damage to enemies in cone every second for 5 seconds.
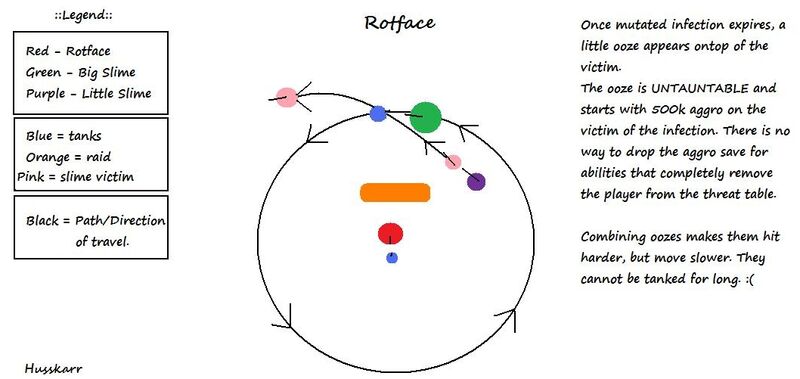
 Mutated Infection-Inflicts 3,900 to 4,100 shadow damage every second and reduces healing received by 50% (Heroic: 75%) for 12 seconds. After the Infection is removed, a small ooze is created at the target's location.
Little Ooze
An ooze spawns when Mutated Infection is removed from a player (either by being dispelled or expiring). These merge into a Big Ooze and eventually explode.
- Sticky Ooze-Inflicts 2,925 to 3,075 damage every second and reduces move speed by 50%.
 Weak Radiating Ooze 10 yd range-Inflicts 3,413 to 3,587 damage to enemies every 2 seconds, and also causes the Little Ooze to merge with other nearby Ooze.
Big Ooze
These result when any two Oozes merge.
- Sticky Ooze-Inflicts 2,925 to 3,075 damage every second and reduces move speed by 50%.
- Radiating Ooze 10 yd range-Inflicts 4,388 to 4,612 damage to enemies every 2 seconds, it will also cause the Big Ooze to merge with other nearby Ooze.
 Unstable Ooze-Increases damage dealt by 20%. Stacks to 10. Applied each time an ooze merges with Big Ooze.
 Unstable Ooze Explosion 10 yd range-Inflicts 9,750 to 10,250 damage to enemies. This is caused by the Big Ooze merging with other oozes 5 times.
Setup
This fight has only one phase. One tank should keep Rotface in the center of the room. A second tank (or other seasoned kiter) needs to kite the big Oozes in a wide circle along the outer wall. The raid stands behind Rotface.
It's a good idea to mark the kiting tank, but raidmarks may be moved at random by some boss mods. If possible, use an [Argent Gruntling] with an [Orgrimmar Banner], or any non-combat pet that follows you closely (usu. a floating/flying pet). [Spring Rabbit's Foot], for example, sits in one spot for a while then jumps to you making it a little less useful for the purpose stated.
Cooldowns
It's frequently recommended to use the DPS cooldowns at 30%. This is not a useful recommendation, since the encounter mechanics remain the same over the whole fight - there is no special enrage at low boss health. The only thing which changes is the Mutated Infection rate, the time between Infections slowly decreases. For this reason, it's best to use all cooldowns just a few seconds after the pull, as soon as everybody is in position. At that point, all damage dealers can maximize their output undisturbed from Infections or small Oozes. It's even possible to have the kiting tank help DPSing until the second Infection.
Slime Spray
In regular intervals, Rotface uses Slime Spray. He turns in a random direction (this ability is not targeted on specific players) and sprays slime in a frontal cone, all raiders must quickly move behind him. It's easier to dodge this ability if everyone stands rather close to him (including ranged). Slime spray has a long range, so it can hit a Mutated Infection victims while they are dealing with their Ooze, in which case they need quick healing.
Some groups do not move for the Slime Sprays. This allows them more time to dps and heal. It also can make it easier to track the off tank's position, so they can move immediately to it, if they need to.
Mutated Infection and Oozes
Dealing with these two elements is the key to this fight. In decreasing intervals, a random raid member gets Mutated Infection. This debuff ticks for some damage for 12 seconds, and then spawns a small Ooze with 500k aggro on the formerly infected player. Whenever any two Oozes get within 10 yards of each other, they automatically combine, always resulting in a Big Ooze. In the case of two Big Oozes merging, the result is the same as though the smaller of the two had merged with a Small Ooze. Big Oozes deal high melee damage, move at half speed and have a normal aggro table -- thus they can be kited.
Players with a Small Ooze must be very careful and may return to the boss only after they're sure it properly merged. Infected players should be aware of the following tips:
- Run ahead of the Big Ooze tank and wait for the Small Ooze to spawn
- As soon as the Small Ooze spawns, snare it or slow it down, so the Big Ooze catches up
- Run with the Ooze kiting tank until the emote is displayed (e.g. "Big Ooze can barely maintain its form")
- Do not use cleanse. Although it's possible to force the Small Ooze spawn by cleansing the Infection, this seems to speed up the Infection rate
- Small oozes cannot be taunted by the offtank. The first Infectee of the fight needs to kite or snare their ooze until a second small ooze spawns and merges with it.
Because the intervals between Mutated Infections decrease, over time the number of oozes and slime patches increases, to the point where they get out of control and the raid wipes (= soft enrage). Kiting and merging Oozes is complicated by Professer Putricide randomly flooding a quarter of the room with poison slime. It's possible to run through short distances of poison slime by jumping, but it's a better idea to keep an eye on the pipes leading into the room and avoid the quarter which gets flooded next. Additionally, the Oozes randomly create slime patches, which should also be avoided.
Whenever a Big Ooze has absorbed five other Oozes, Rotface emotes, and four seconds later the Big Ooze explodes. This deals heavy AoE damage around the Ooze, and additionally rains small globules of slime at random raiders. The targeting of these small globules takes place once the casting of Unstable Ooze Explosion completes, so everyone must wait to move until the cast is complete.
Problems
A major problem in this encounter are accidental merges of Small Oozes while another Big Ooze is already up. This leads to a "loose" Big Ooze, which usually aggros a healer, heads straight into the raid and kills everyone with its aura. Players trailed by Small Oozes must take care to avoid this. In the later stages of the fight, when Mutated Infections happen faster, accidental merges may happen nonetheless. The Ooze kiter must be aware of this possibility and quickly taunt surplus Big Oozes. Some raids pre-designate a second kiter who takes care of extra Big Oozes.
The healers' focus should be on the raid and on Mutated Infection targets in particular. 1/2 (10/25 player) healers are enough to keep the tank up. All other healers must watch over the raid. Mutated Infection targets may be unable to avoid Slime Spray and/or may be forced to run through poison slime.
It may help to have one person call out what is happening. DPS/Healers can be told when to switch sides, and people with the slime debuff can be alerted. Situational awareness is required from every raid member.
Class-specific Tactics
- Death knights are arguably the best choice for an ooze kiting tank, due to their many long-range threat generation abilities. Chains of Ice are invaluable for snaring the little oozes in position to be engulfed by the big ooze.
- Mages should avoid using Mirror Image: this may confuse the little oozes' aggro table, causing them to stop chasing the mage and aggro on a healer. Slow can be cast on the oozes to help the designated kiter if they are having problems.
- Paladins should be prepared to cast Hand of Freedom on the offtank, should he need to run through the ooze flood.
- Shadow Priests can use Dispersion to run through the big ooze, merging their own ooze in the process.
- Warlocks can use Shadow Ward to slightly diminish the damage from ticking Mutated Infection, thus easing the healers job.
coming soon